

Workflow at a glance
Choose products and set prices
Define the exact variant scope, exclusions, Price change, and Compare-at price behavior for the sale.
Preview before scheduling
Review affected variants and calculated prices, then copy the preview configuration into a scheduled task.
Schedule start and rollback
Set the sale start and end together so rollback restores the original saved values automatically.
A simple 20% sale could look like this:
Before the sale
- Price: $100
- Compare-at price: empty
During the sale
- Price: $80
- Compare-at price: $100
After rollback
- Price: $100
- Compare-at price: restored to original value
For temporary sales, restoring original values is safer than reversing discounts with another percentage calculation.
In Springify Bulk Price Editor, previewing and scheduling are separate steps. First, create a preview task and check the affected variants. If everything looks good, copy that task and schedule the sale and rollback.
Shopify sale prices vs Shopify Discounts
Changing Price or Compare-at price changes the product pricing stored in Shopify.
Shopify Discounts work differently. They apply discounts through Shopify’s discount system rather than by changing the product’s stored Price.
For a typical sale-price setup:
- Price: $80
- Compare-at price: $100
The storefront can show $100 as the previous price and $80 as the current price, depending on the theme.
This guide focuses on scheduled pricing changes, not discount codes.
Step 1: Choose the products and variants
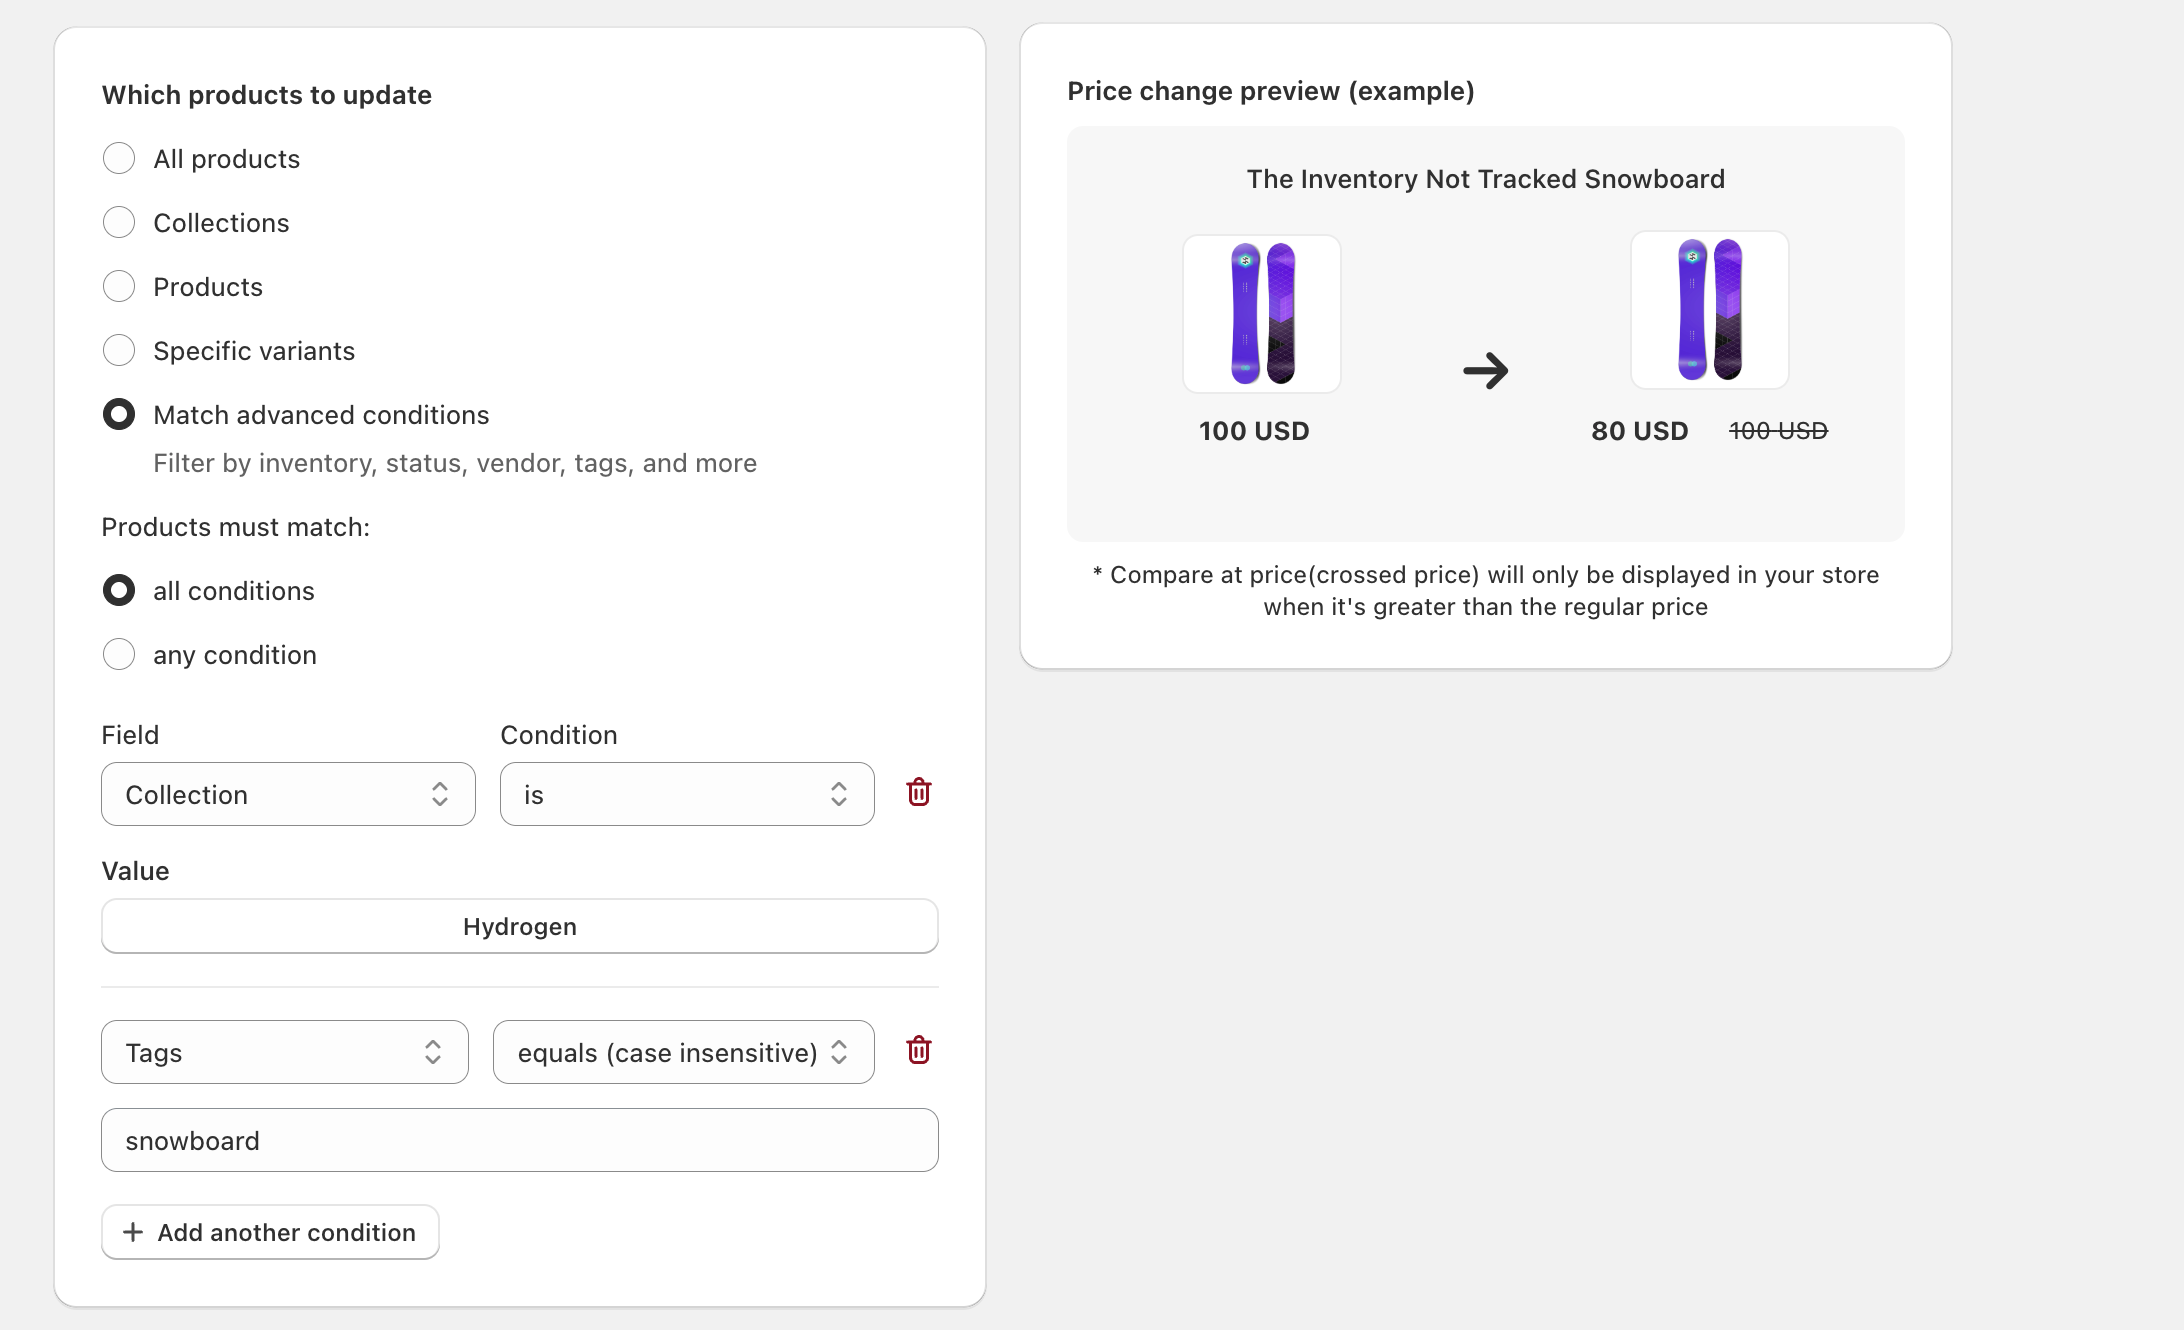
In Springify, you can target the whole store, specific products, variants, or collections, or build custom selections with filters for tags, vendors, collections, product status, inventory, sale status, and other conditions. Combine filters as needed and exclude products, variants, or collections from the selection.
Springify applies price changes at the variant level. Preview shows the number of affected variants, so you can verify the scope before scheduling the sale.
Step 2: Set the sale price and Compare-at price
Next, decide what happens to the selling price.
For a temporary sale, common options include:
- decrease Price by a percentage;
- decrease Price by a fixed amount;
- set a fixed Price;
- keep the existing Compare-at price;
- set Compare-at price from the current Price;
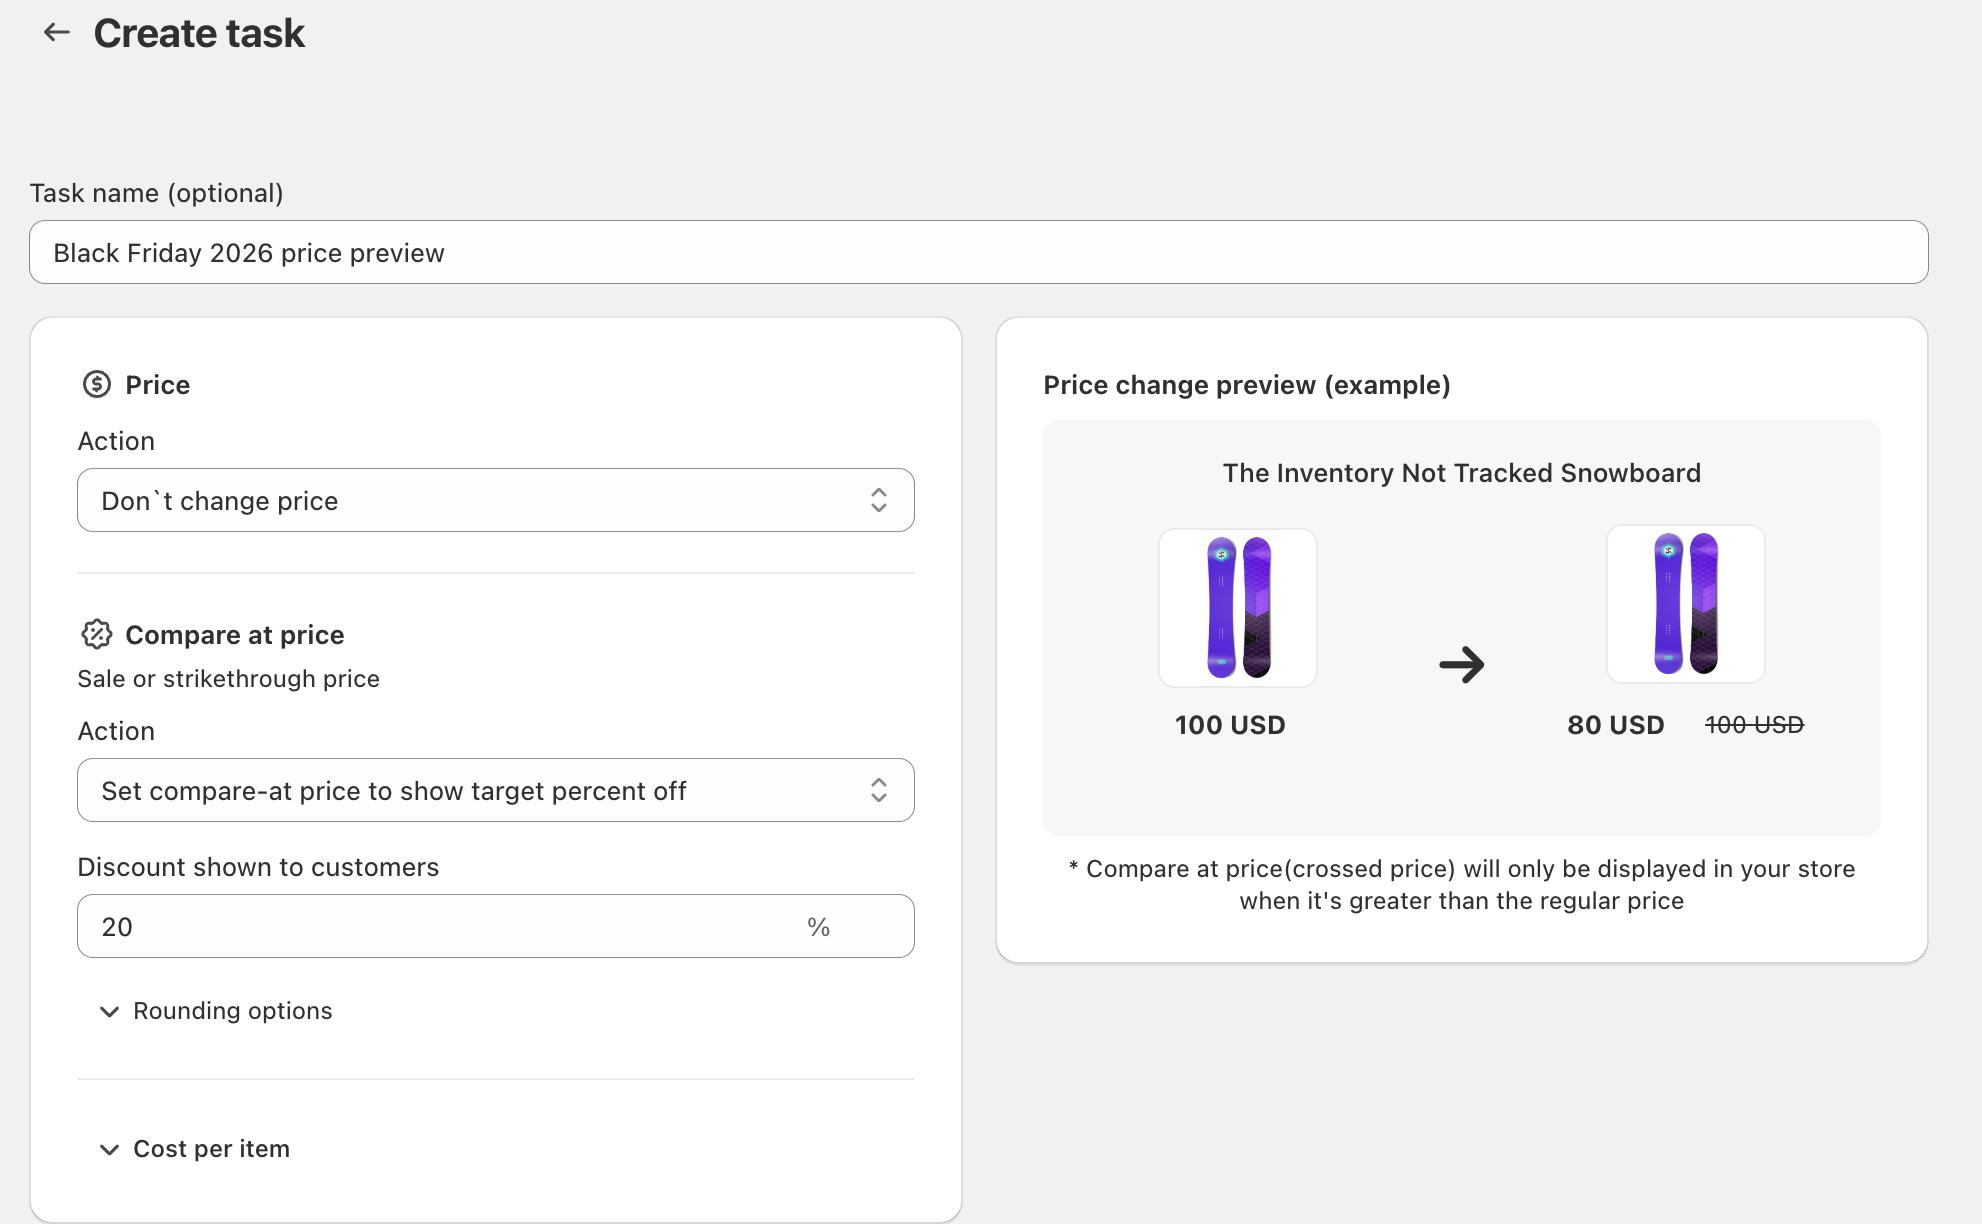
- set Compare-at price to show a specific discount percentage;
- change both Price and Compare-at price together.
For a simple 20% sale:
Before
- Price: $100
- Compare-at price: empty
During the sale
- Price: $80
- Compare-at price: $100
The customer pays $80, while the higher Compare-at price shows the previous price.
What if the product is already on sale?
Suppose the product already has:
- Price: $90
- Compare-at price: $100
You want an additional 5% off the current selling price while keeping the existing Compare-at price.
The result should be:
- Price: $85.50
- Compare-at price: $100
The 5% reduction is calculated from the current Price of $90.
Set Compare-at price from the discount you want to show
A common mistake is raising the Compare-at price by the same percentage you want customers to see as a discount.
For example:
- Price: $100
- Compare-at price: $120
The actual discount relative to $120 is:
So a Compare-at price that is 20% higher does not represent 20% off.
If $100 should represent a true 20% discount:
The result is:
- Price: $100
- Compare-at price: $125
- Discount: 20%
Springify can calculate this for you. Choose Set compare-at price to show target percent off and enter the discount you want customers to see. If the task also changes the Price, the Compare-at price adjusts accordingly.
For a deeper explanation of the calculation, see the Shopify Compare-at Price guide.
Step 3: Preview the price changes
Before scheduling the sale, create a preview task.
Check:
- affected variants;
- excluded products;
- current Price;
- new Price;
- current Compare-at price;
- new Compare-at price;
- obvious price outliers.
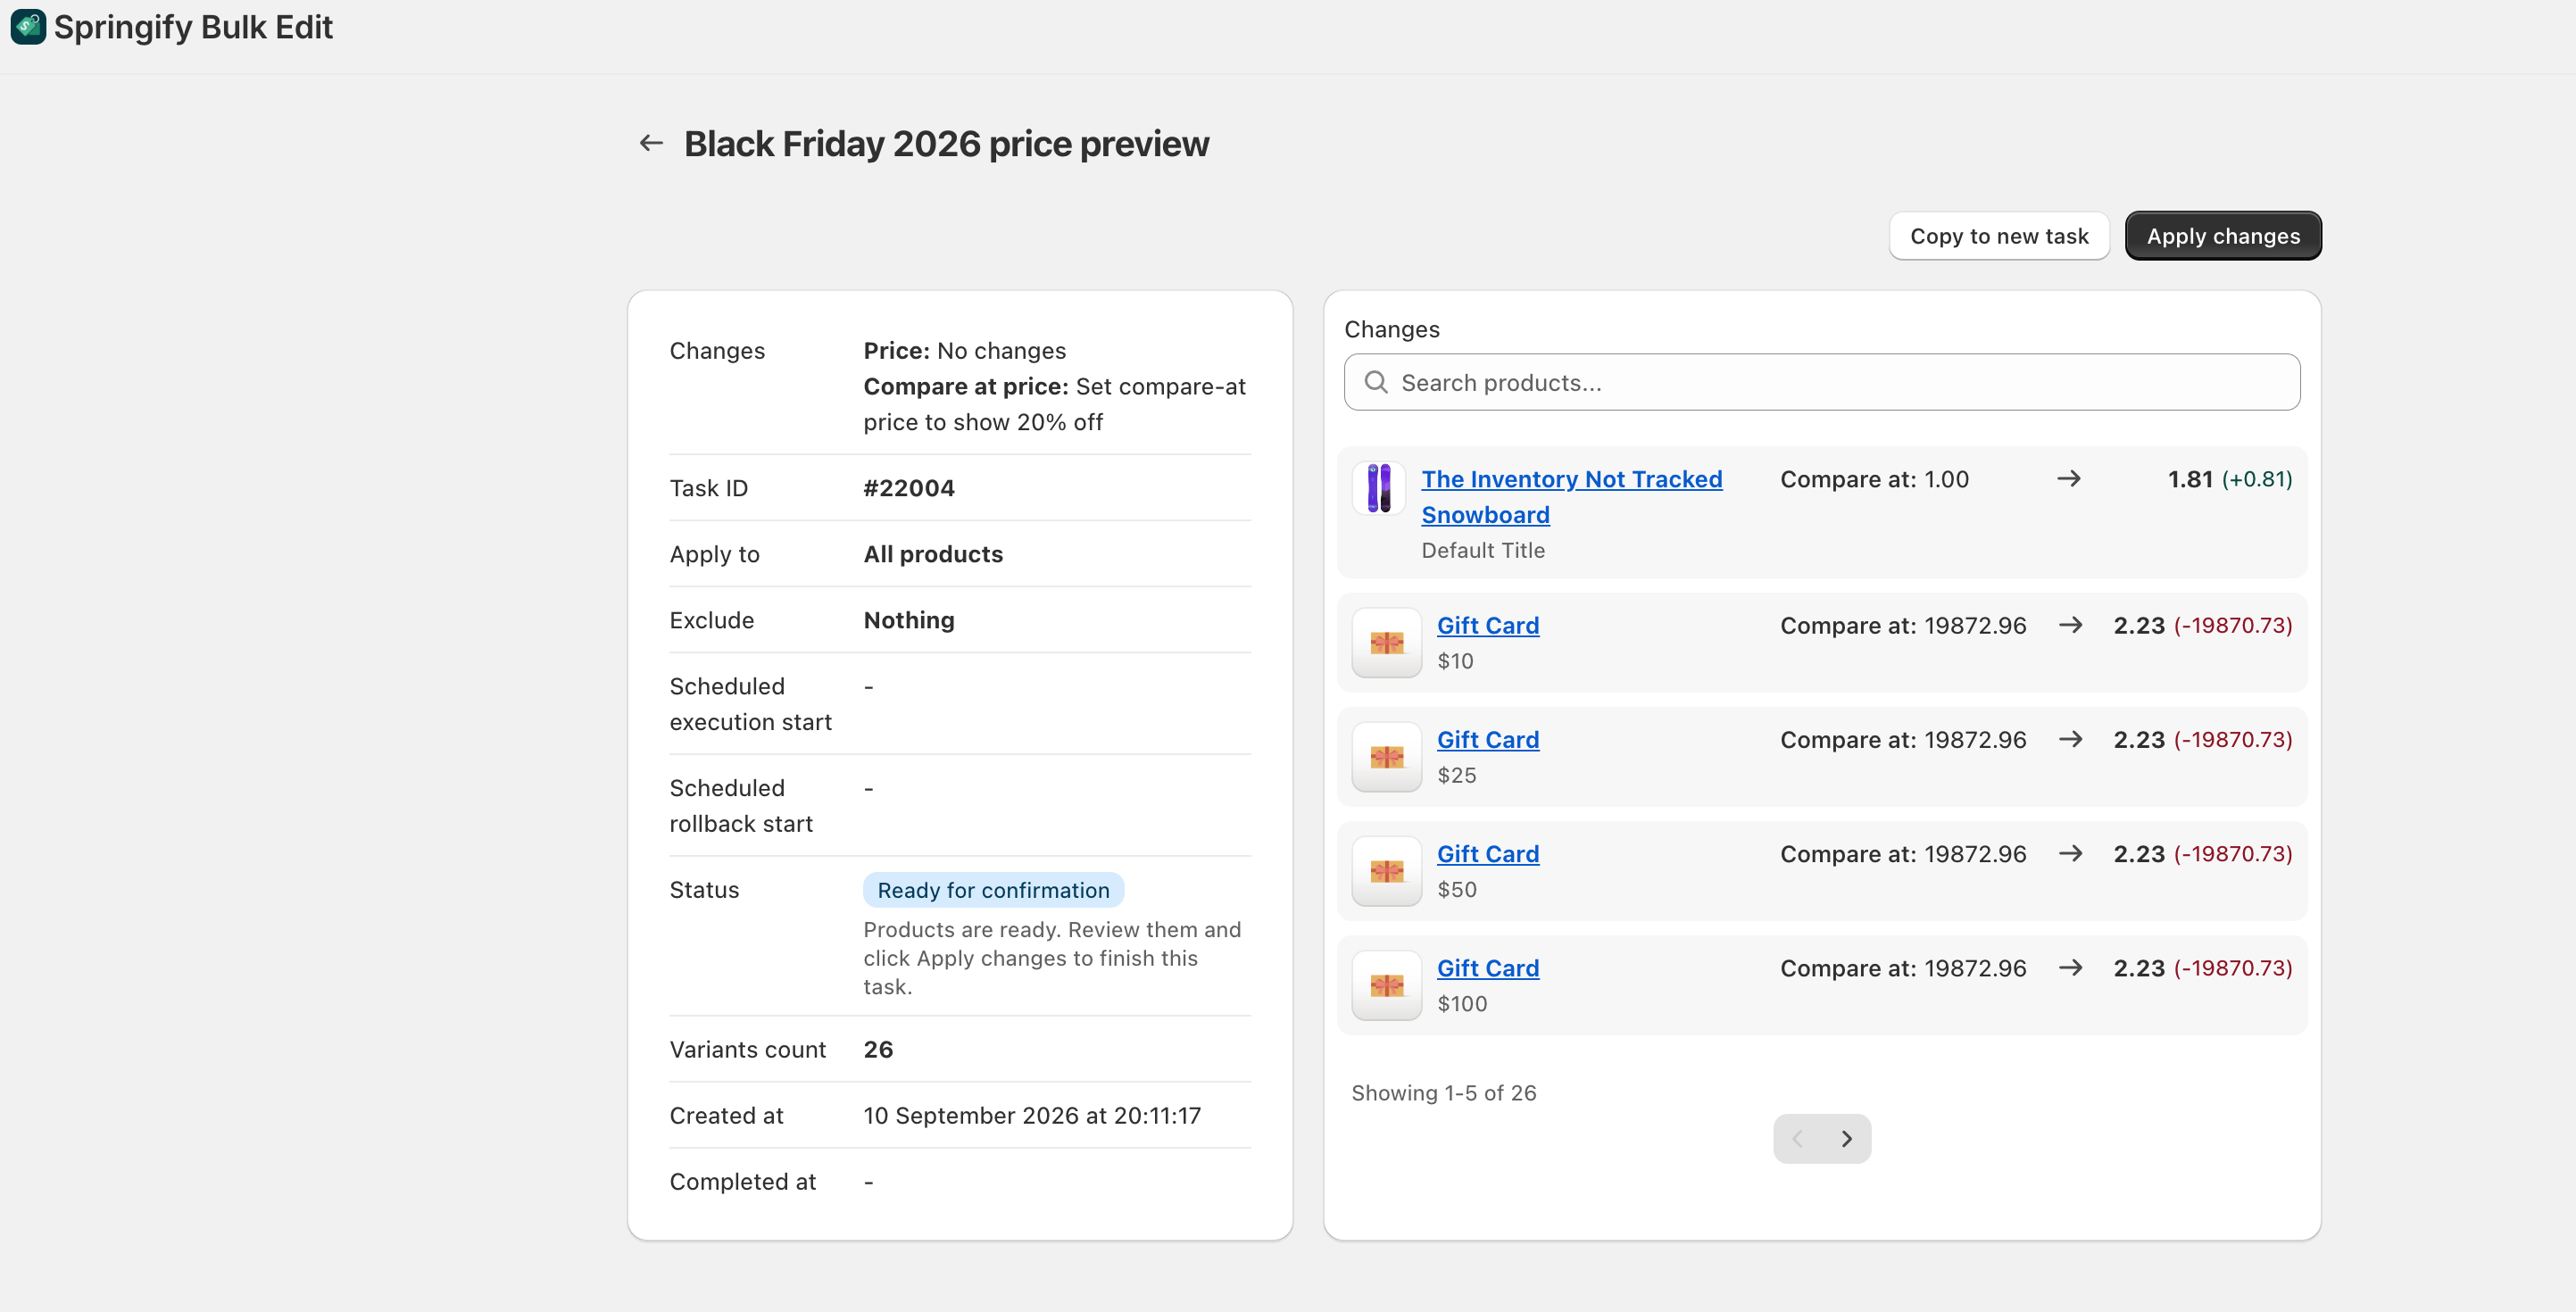
In Springify, a preview task cannot be scheduled directly.
Use this workflow:
- Create the preview task.
- Review the affected variants and resulting prices.
- Open the preview task and choose Copy to new task.
- Keep the same selection and pricing configuration.
- Add the scheduled start and scheduled rollback.
- Create the scheduled task.
This lets you verify the actual variants and calculated prices before creating the scheduled version.
Step 4: Schedule the sale and automatic rollback
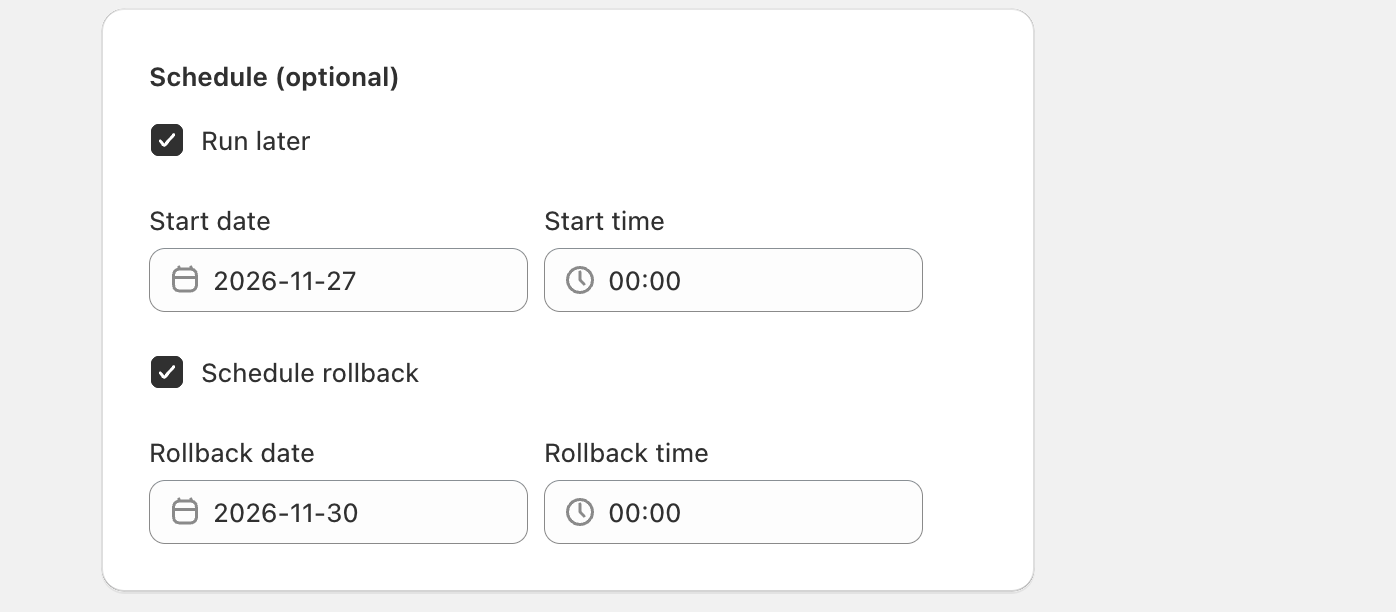
In the copied task, enable the scheduled start time and choose when the sale should begin. Then enable scheduled rollback and set when the promotion should end.
For example, a Black Friday promotion could start on November 27, 2026 and roll back on November 30, 2026.
Before finalising the task, check the selection, exclusions, pricing setup, start time, and rollback time.
Step 5: Restore the original prices
Rollback should restore the values saved before the sale.
It should not try to undo the discount using the opposite percentage.
For example:
Increasing $75 by 25% gives:
It does not return the price to $100.
For a temporary sale, the safer workflow is:
Springify stores previous values for variants changed by the task for rollback.
Extra protection with Price Vault
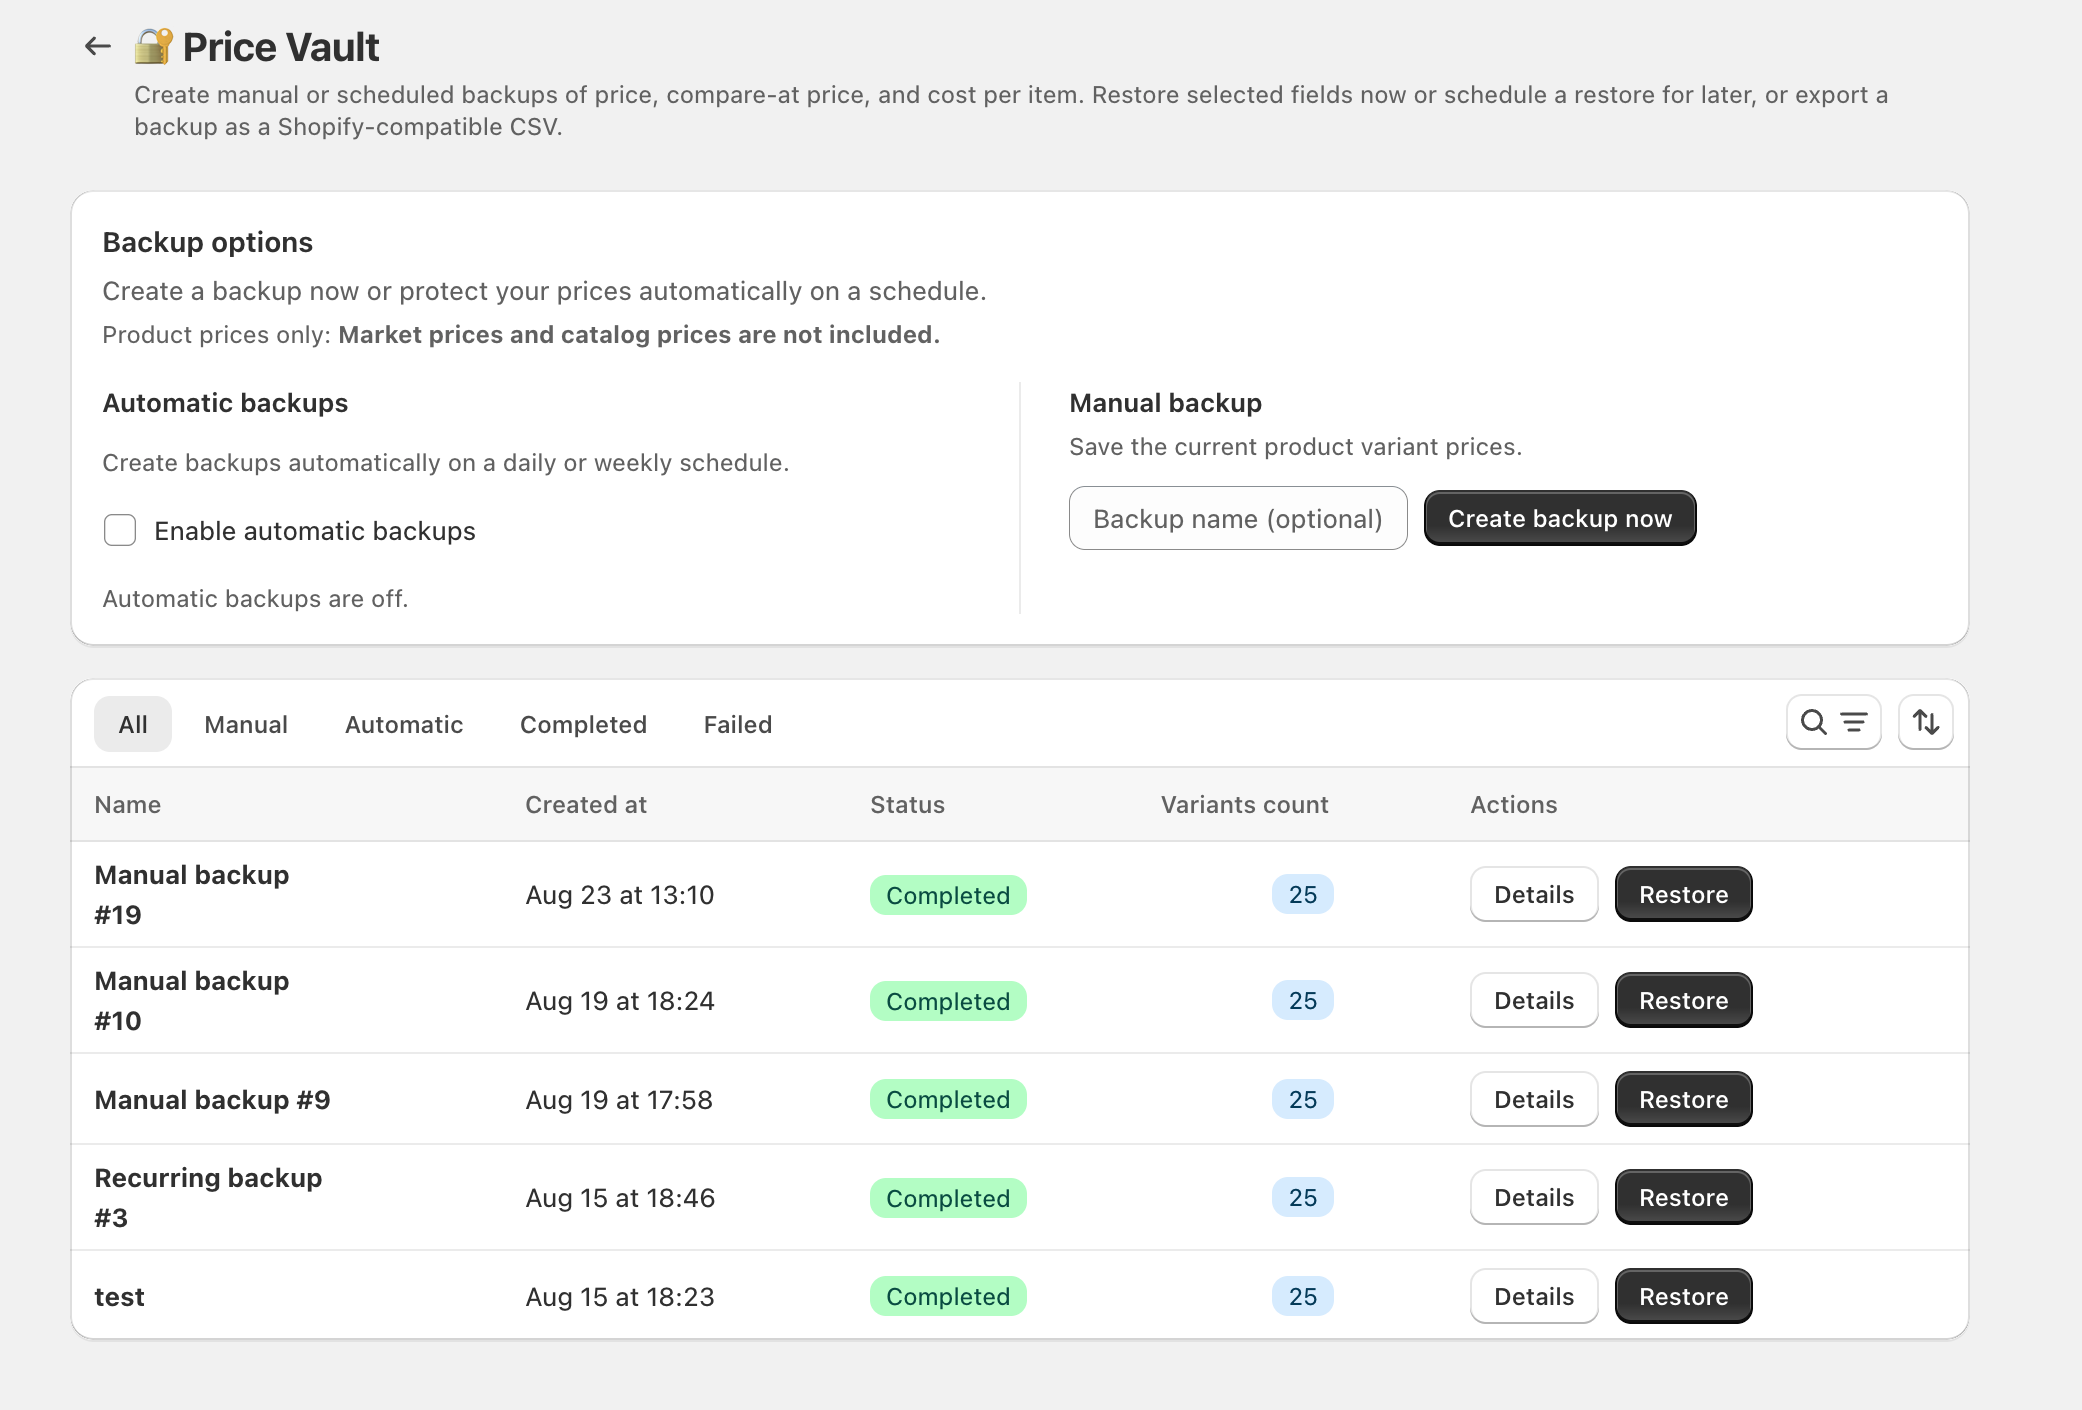
Task rollback restores values saved for that specific price task. Springify Price Vault provides a separate pricing snapshot. An initial snapshot is created automatically when Springify is installed, and you can create another snapshot before a major sale.
Step 6: Avoid conflicts while the sale is active
Prices can still be changed after the scheduled sale starts.
Manual price edits
Suppose:
- original Price: $100;
- scheduled sale Price: $80;
- manual edit during the sale: $85.
If rollback later restores the saved pre-sale value, the Price can return to $100 rather than stay at $85.
Keep this in mind before manually editing the same pricing fields during an active sale.
Other apps and integrations
Imports, ERP systems, sync apps, and other pricing tools can also update Price or Compare-at price.
If another system changes the same field during the campaign, the live Shopify value may differ from the value set by the scheduled task.
Overlapping price tasks
Be careful when separate tasks change the same variant.
For example:
Task B saves the state that existed after Task A. Task A has its own earlier saved state.
If both changes later need to be rolled back, rollback order can matter.
For a straightforward temporary sale, avoid unnecessary overlapping price tasks on the same variants.
Practical checklist
Before creating the scheduled sale, confirm:
- the correct products, collections, or matching conditions are configured;
- exclusions are correct;
- the preview has been reviewed;
- the affected variant count looks correct;
- the Price calculation is correct;
- the Compare-at price behavior is intentional;
- the preview task has been copied for scheduling;
- scheduled start is configured;
- scheduled rollback is configured;
- no conflicting price task or integration is expected;
- for a large or important campaign, consider creating a fresh Price Vault snapshot.
Guide FAQ
Will products added after the sale starts automatically join the sale?
No. A scheduled task applies its price changes to the variants selected when it runs; it does not continuously watch the store for new products.
Can I restore the prices from one specific sale?
Yes. Springify stores the previous values for variants changed by a task and can use them for manual or scheduled rollback.
Can I schedule different prices for Shopify Markets?
Springify changes the store's main product pricing. If you use fixed prices or other market-specific pricing, verify how those values interact with the main product prices before scheduling the sale.
Does cancelling or deleting a task restore the prices?
Not necessarily. Cancelling or deleting a task is different from rolling back price changes. If prices have already changed, use rollback to restore the saved values.
Does uninstalling a bulk price editor restore the old prices?
No. Removing an app does not itself restore Price or Compare-at price values that the app already wrote to Shopify. Restore the prices before uninstalling if that is the result you want.