

With Springify Bulk Price Editor , you can set up a standard Shopify sale in one task: configure the sale price and Compare-at price, choose the products, preview the changes, and apply them. The steps below follow the same order as the app.
How to run a Shopify sale in 6 steps
Set the sale price
Decrease Price by a percentage or amount, or set an exact new Price for the selected variants.
Set the old price as Compare-at
Use the original Price as the Compare-at price so the storefront can show the regular and sale prices.
Choose what goes on sale
Select the whole store, collections, products, variants, or matching conditions, then add any exclusions.
Preview the sale
Prepare products for review and check every affected variant, exclusion, and calculated price before applying changes.
Apply the sale
Apply the reviewed changes to the selected variants in Shopify.
Verify the sale
Check representative products in Shopify Admin and on the storefront.
A simple sale setup looks like this:
| Before | During Sale | |
|---|---|---|
| Price | $100 | $80 |
| Compare-at price | — | $100 |
The customer pays $80, while the store can show $100 as the old price.
Sale Prices vs. Shopify Discounts
Use Price + Compare-at price when you want to change the product price.
Common examples:
- 20% off a collection
- Storewide sale
- Black Friday sale
- Clearance sale
- Temporary price cut
Example:
| Price | Compare-at price |
|---|---|
| $80 | $100 |
Use Shopify Discounts when discounts depend on rules like:
- Discount codes
- Eligible customers
- Minimum order amount
- Buy X Get Y
- Free shipping
- Discount combinations
The main difference is:
Sale prices change the product price. Shopify Discounts control when a discount applies.
If a product costs $100 and you set its price to $80 for everyone, that’s a sale price.
If some customers get an extra 10% off at checkout, that’s a Shopify Discount.
Before starting a sale, check if any Shopify Discounts also apply at checkout.
Step 1: Set the Sale Price
In Springify, the quickest way to set up a standard sale is to use the Start sale template. It prepares the Price and Compare-at actions for a typical sale, which you can then adjust as needed.
You can change prices by percentage, fixed amount, or exact price.
By Percentage
Examples:
- $100 → $80 at 20% off
- $75 → $60 at 20% off
This is useful when you want to apply the same discount to many products.
By Amount
Examples:
- $50 → $45 with $5 off
- $80 → $75 with $5 off
Set New Price
Example:
- $100 → $29.99
Use this when all selected products should have the same price.
If different products need different discounts, split them into separate groups.
Step 2: Set the Old Price as Compare-at
A typical Shopify sale looks like this:
Before:
- Price: $100
- Compare-at price: empty
During the sale:
- Price: $80
- Compare-at price: $100
The Price field determines what the customer pays.
The Compare at price field can show the old or reference price next to the current price.
For a standard sale in Springify:
- use Decrease price for Price;
- use Set to price for Compare at price.
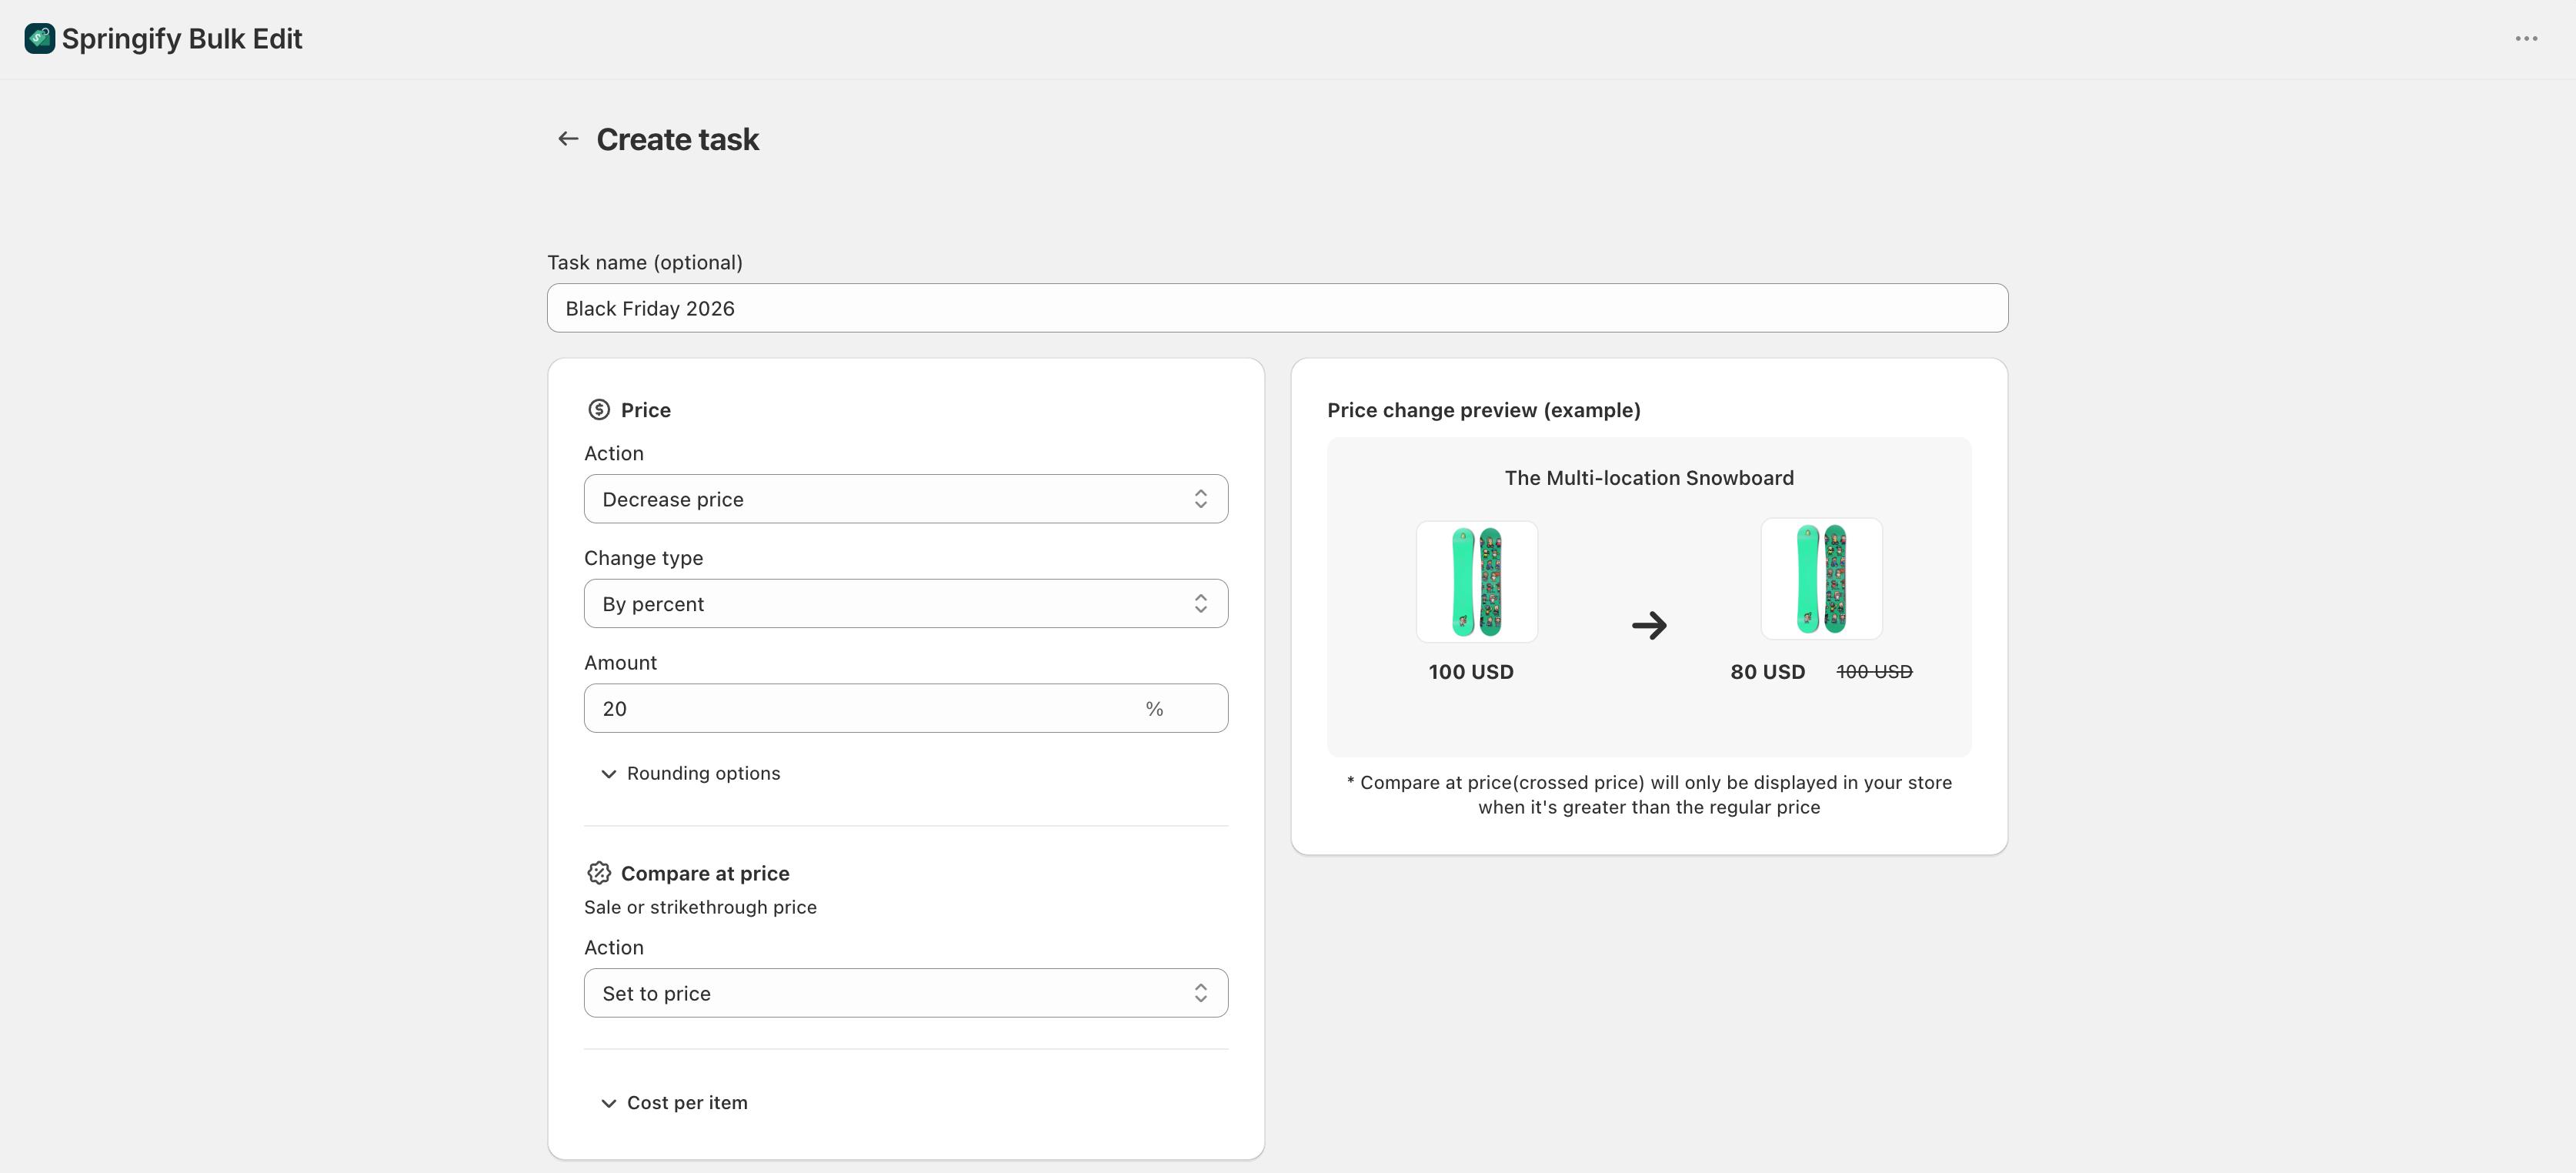
For more details about compare-at prices, calculations, and display issues, see the Shopify Compare-at Price guide.
Step 3: Choose What Goes on Sale
Choose where the pricing changes should apply:
- The whole store
- Selected collections
- Specific products
- Specific variants
- Products that match conditions
You can also exclude products, variants, or collections from the selected group.
Example:
Apply the 20% Black Friday sale to the whole store, excluding new arrivals and one premium collection.
Step 4: Preview the Sale
Before applying the price changes, generate a preview of the task.
Click Prepare products for review.
When the preview is ready, review the products and variants that will change.
Check:
- Which variants will change
- Which products are excluded
- Current and new Price
- Current and new Compare at price
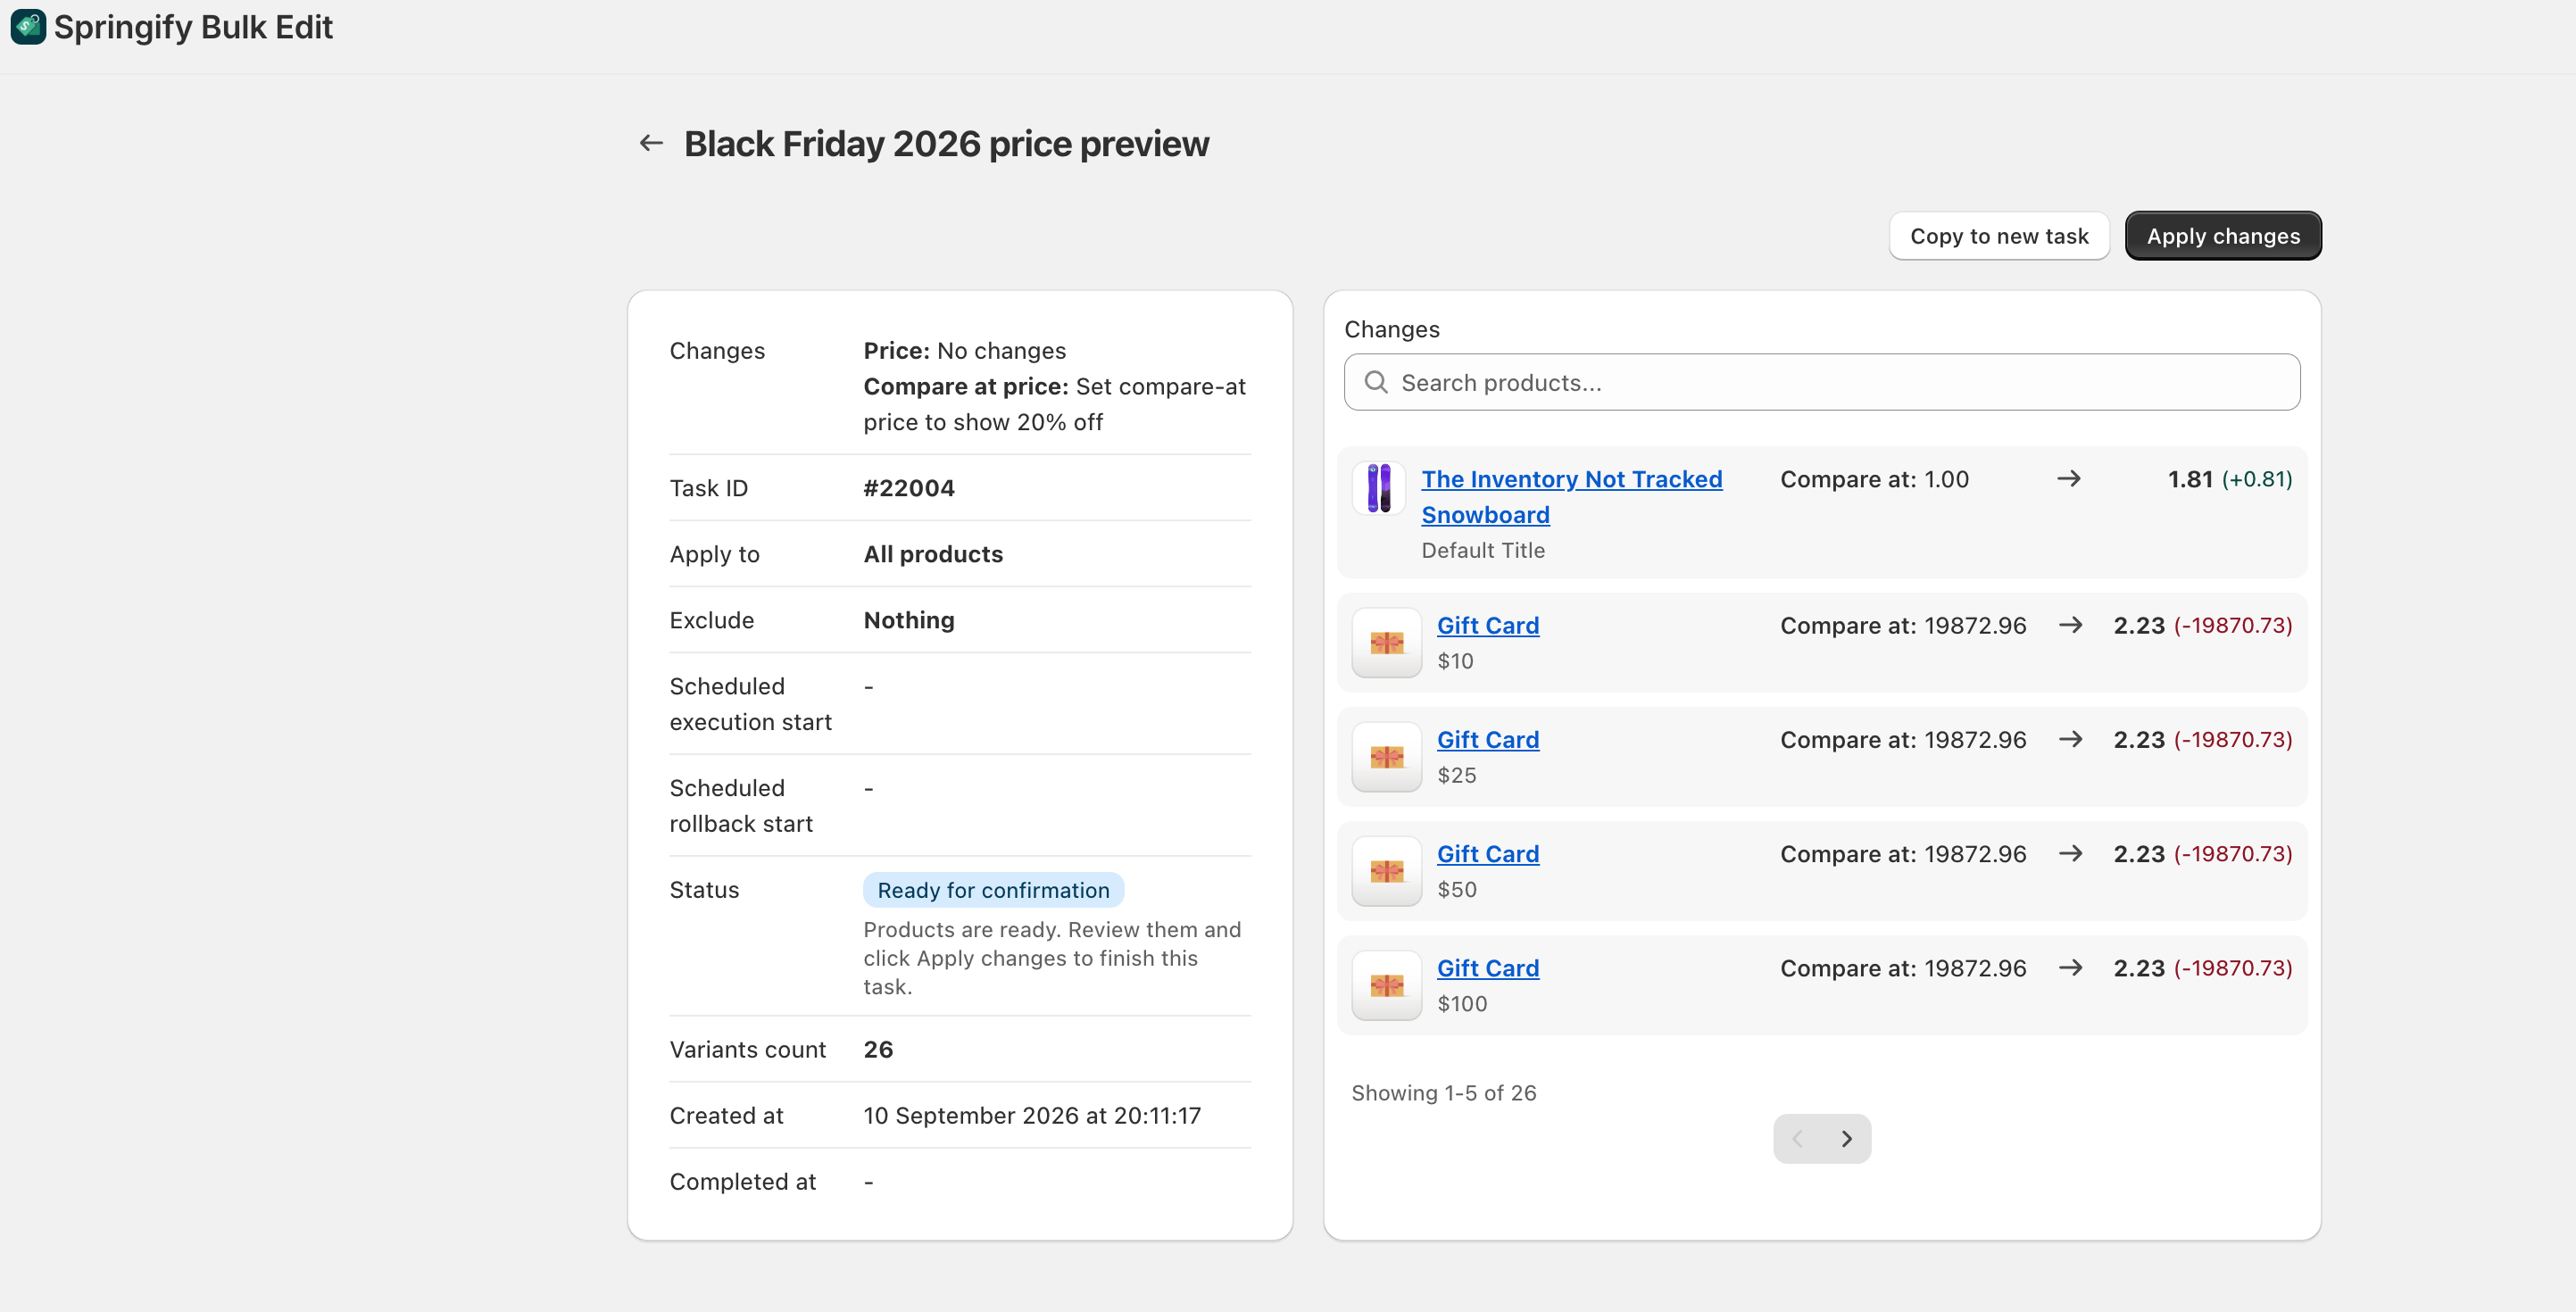
This is especially useful for storewide sales, where one wrong rule can affect many products.
If something looks wrong, go back and change the task settings before applying the changes.
Step 5: Apply the Sale
When the preview looks correct, click Apply changes.
Springify will update the selected variants in Shopify.
After the task completes, check a few products in Shopify Admin and on your storefront.
Don’t assume every storefront page shows the new prices immediately.
Step 6: Verify the Sale
Check both Shopify Admin and your storefront.
Check at least:
- A normal product
- A product with several variants
- An excluded product
- A product with a compare-at price
If the Storefront Looks Wrong, Check Shopify Admin First
Open the affected variant and check:
- Price
- Compare at price
Shopify Admin Has the Wrong Values
There may be a problem with the price update.
Shopify Admin Has Correct Values, but the Storefront Does Not
Don’t run the pricing task again right away.
The storefront might still show old prices even when Shopify Admin has the correct values.
The issue could be with the theme, cache, or how variants are displayed.
Use this order:
- Admin wrong → check the price update
- Admin correct → check storefront/cache/theme
This helps avoid changing correct prices just because the storefront shows an old value.
How to End the Sale
The safest way to end a Springify sale is to use Rollback changes.
Springify records the original values for the variants changed by the task.
For example:
Before the sale:
- Price: $100
- Compare-at price: empty
During the sale:
- Price: $80
- Compare-at price: $100
After Rollback changes:
- Price: $100
- Compare-at price: empty
This restores the values saved when the original task ran.
Why You Should Not Reverse the Discount
Do not try to undo a discount by applying the same percentage in the opposite direction.
For example:
- $100 → -20% → $80
- $80 → +20% → $96
Adding 20% does not undo a 20% discount.
To return $80 to $100 mathematically, you would need to increase it by 25%.
Using Rollback changes is safer because Springify restores the saved original values instead of trying to calculate the old price again.
Be Careful if Prices Changed After the Sale Started
Rollback restores the values saved when the task originally ran.
If a price was changed later by another task, app, import, API integration, or manual edit, Rollback changes will replace that newer value with the saved value.
Check for later price changes before rolling back an older task.
Another Way to End a Sale
If the current Compare at price already contains the regular price you want to restore, you can also use:
- Set to compare at price
- Remove compare at price
Example:
During the sale:
- Price: $80
- Compare-at price: $100
After:
- Price: $100
- Compare-at price: empty
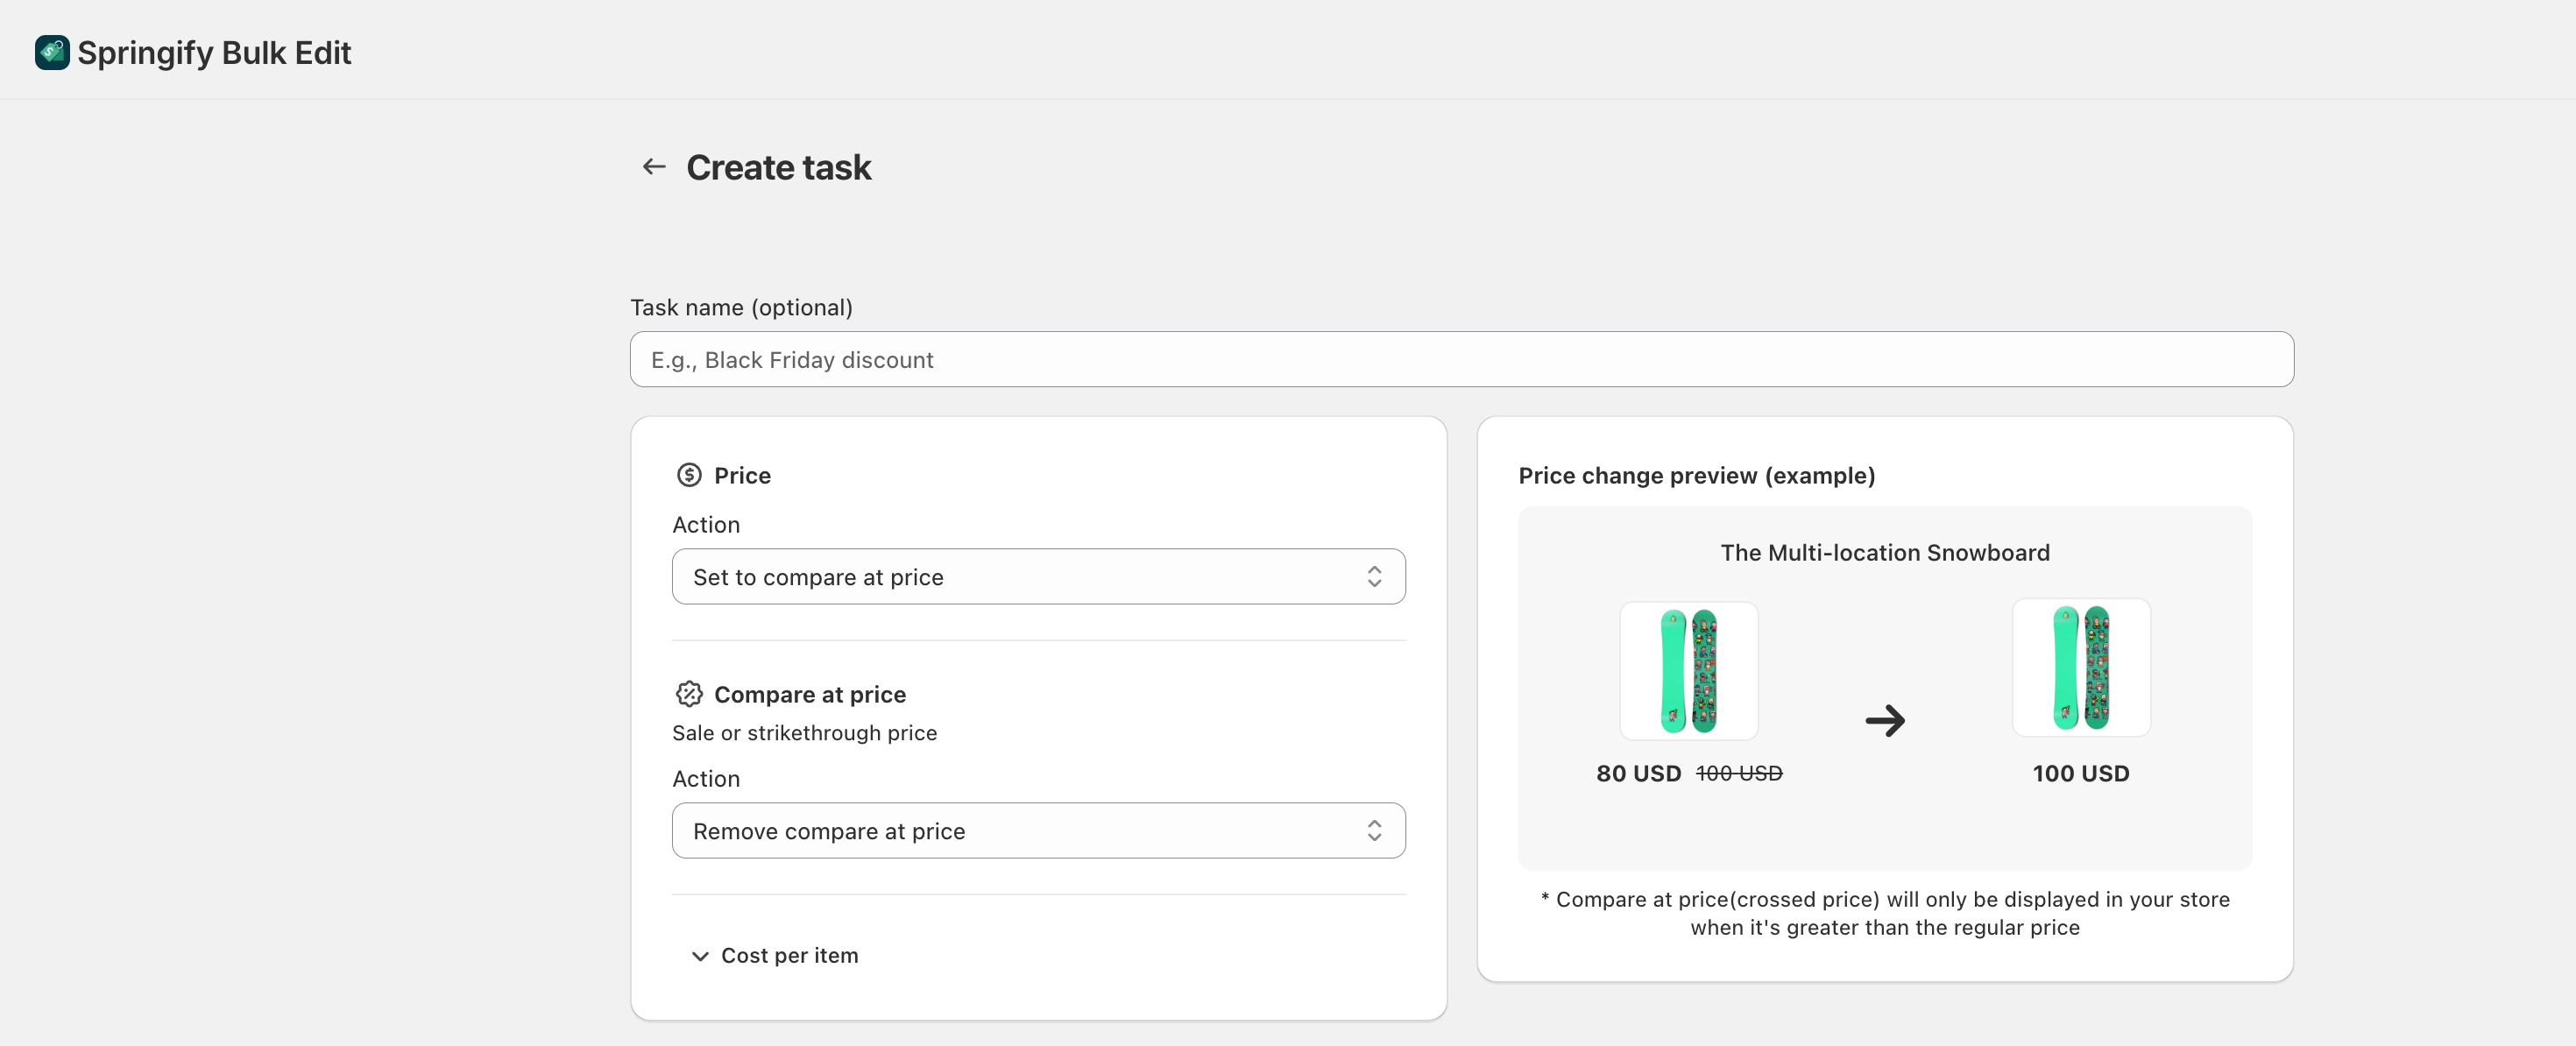
Use this only when Compare at price contains the correct regular price.
If Compare at price is empty, Set to compare at price will not restore the regular price. The current sale price will remain.
If Compare at price was changed after the sale started, this method may restore the wrong price.
For most Springify tasks, Rollback changes is the safer option.
Deleting a Task Does Not End the Sale
Deleting a completed pricing task does not restore the prices it changed.
The same applies if you uninstall a bulk price editor.
Once new Price or Compare at price values are saved in Shopify, they remain until another update changes them.
End the sale first by restoring the prices.
Want the Sale to Start and End Automatically?
You can prepare a sale in advance, schedule when it starts, and automatically restore the old prices when it ends.
See How to Schedule Shopify Sale Prices and Restore Them Automatically for the full guide.
Common Problems
Another System Changes Price or Compare-at Price
Your bulk price editor may not be the only system changing product prices.
An ERP, import, feed, another app, API integration, or manual edit can change:
- Price
- Compare at price
If prices look correct after the bulk update but change later, check what other systems can edit these fields.
Several Pricing Tasks Change the Same Variants
If several tasks change the same variants, each task can start from prices set by the previous task.
Example:
If you later roll back both tasks, work backward:
Rolling back an older task first can overwrite values created by a newer task.
Try to avoid overlapping temporary pricing tasks when possible.
Practical Sale Checklist
Before the sale:
- Set the discount
- Set Compare at price
- Choose the products, collections, or variants
- Add exclusions if needed
- Check if another system can change prices
- Prepare products for review
- Check the preview
- Apply changes
After the sale starts:
- Check Price and Compare at price in Shopify Admin
- Check the storefront
- Check a few different products
- Don’t run the task again if Shopify Admin is already correct
When the sale ends:
- Check whether prices changed after the sale started
- Use Rollback changes to restore the saved original values
Guide FAQ
How do I put products on sale in Shopify?
Lower the product Price and set the old regular price as the Compare-at price. For example, use a Price of $80 and a Compare-at price of $100. The customer pays $80, while the storefront can show $100 as the old price.
How do I start a sale in Springify?
Use the Start sale template. Set your discount, set the old price as the Compare-at price, choose the products, and click Prepare products for review. Review the variants, click Apply changes, then verify the sale in Shopify Admin and on the storefront.
How do I preview a sale before changing prices?
Click Prepare products for review. Springify will prepare the selected variants so you can review the current and new prices before clicking Apply changes.
How do I show the old price next to the sale price?
Put the sale price in Price and the old regular price in Compare-at price. Your theme decides how this looks. It may show a crossed-out price, a SALE badge, or a discount percentage.
Should I use sale prices or Shopify Discounts?
Use sale prices when you want to change the product price. Use Shopify Discounts when the discount depends on a customer, cart, order, code, or another rule.
Can customers use a Shopify Discount on products that already have a sale price?
Sale prices and Shopify Discounts are separate. If you use both, check the discount rules before starting the sale.
How do I return products to their original prices?
For a Springify task, use Rollback changes. Springify records the original values changed by the task and can restore them later. Check whether those prices were changed again after the original task before rolling it back.
Why shouldn't I undo a 20% discount by increasing prices by 20%?
Because the percentage is calculated from a different number. For example, $100 reduced by 20% becomes $80, but $80 increased by 20% becomes $96. Use Rollback changes instead of trying to reverse the percentage.
Does deleting a pricing task restore the prices?
No. Deleting the task does not undo Price or Compare-at price values already saved in Shopify.
Does uninstalling the app restore old prices?
No. Prices stay in Shopify until they are changed again.
Can I schedule a Shopify sale in advance?
Yes. You can schedule the price change and restore old prices later. See the guide to scheduling Shopify sale prices for the full workflow.